If you have thought about creating physical models from your Sketchup files, it has never been a better time and it is actually very easy!
I recently acquired a Qidi Tech 1 3d printer from ebay.com.au for a little bit under AU$1000 which arrived at my doorstep at lightning speed. I chose this particular printer for its good reviews, substantial user base and the fact that this is a rebadged version of a much more expensive Makerbot printer, making it very good value for money. It also has a dual nozzle allowing the you the option to print different colours simultaneously and it comes with a heated building platform which is important when the printer puts down the first rows of your model onto the build surface.
 After assembling the printer and calibrating the building platform with the printing head, I created a few objects for test printing, including a small 2cm cube and my Sketchup Training logo which I spray painted grey as a bit of a trial. See photos of these examples on the page.
In terms of turning your Sketchup objects into 3d prints, it is actually very easy. When modelling, I found that it is best to work in solid groups because the printer utility recognises these and automates most of the model formatting. Depending on scale, the printer will print quite fine details in your model like shadow lines, so don’t hold back on detailing your model with corrugations, brick patterns and other details.
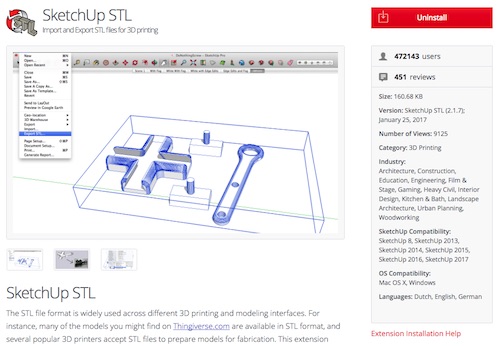 You cannot print directly from Sketchup. What you have to do is transfer your 3d model from Sketchup to the 3d printer by first converting your file into a compatible 3d printing format. STL files are a common file type for 3d printing and you will need to install an STL exporting plugin which is readily available from the Extensions Warehouse.
UPDATE 16/6/17 - You no longer need to download this extension because the ability to export STL files has been incorporated into the base program.
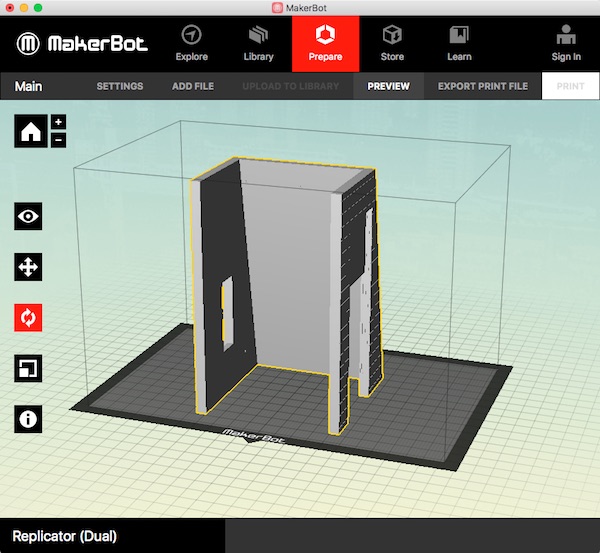
After exporting your model file to STL format, you need to load it into the proprietary printing software that came with your printer. My printer came with Makerbot print software which is very easy to use. Simply import the STL file into this program and set up/orient your 3d model onto the virtual printer base.
There is some preparation involved in setting up the print that you need to consider. The print process works by building up layers of material so where there are holes or gaps in your model, you may require the addition of rafts and little support structures which help you bridge over these gaps. It is important to consider the best orientation when printing to minimise these structures because wastage is wastage! The support structures should break off cleanly at the end when printing is complete.
 Once you are satisfied that the object you plan to print will not collapse on itself and will print cleanly, the file is turned into a print file that is ready to print. In my case, I simple transfer the file to an SD card which I can then insert into the printer, select the file and then off it goes!
It is fascinating to watch though bigger objects can take many hours to print; in many cases 8-10 hours!
It does take a bit of time and practice to work out what will work best. While I am hardly experienced when it comes to 3d printing, I have learn quite a bit in a comparatively short time.
Here are a couple of tips:
- When setting up your 3d object, it is easier to use the Sketchup move, rotation and scale tools to orient your model before importing it into the printer software. You have much better control.
- Prepare the build plate with water-based glue stick like UHU because this helps the first layer to adhere to the surface providing a good base for the printed object.
- When finished, the 3d print can be difficult to remove from the build plate. The best way to get it off the plate that I have found so far is to use a small painter’s palette knife and work around the edges until you can get under it.
- PLA (Polylactic Acid) is the most common thermoplastic filament used for 3d printing. Like most filaments, it must be stored in low humidity environments to maintain its print quality.
- When making complex multi-piece models, you need to glue parts together. For PLA, the best glue that I have used so far is Loctite Gel Control which is available at Bunnings.
- Cuticle nippers which look like mini pliers are great for cutting little blobs of excess plastic that can appear from time to time.
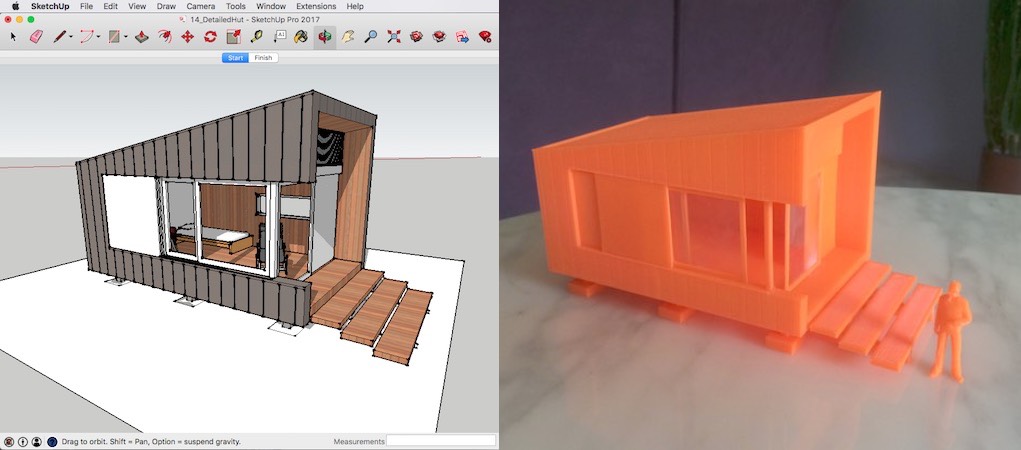
For those of you who have completed my Sketchup Modelling Essentials short course, you will be familiar with the “detailed hut” below which is a small one room structure that has a sloping colorbond roof and sits off the ground on stumps. Now I only had orange filament that came with the printer at the time (the white filament is on the way) and I have not done too much to clean up the rough edges but hopefully it gives you an idea of what is possible with Sketchup and a 3d printer!